
It's really just another social networking site (you can invite friends, follow friends, etc.). But I love how it organizes all of the great ideas I find on the internet in one neat organized spot.
What it really means is that I no longer have piles and piles of recipes that I printed off that I want to try someday. Now they are all neatly store in cyper-space and I can just pull up my Pinterest account when I am ready to make them.
I call it crack for crafters.
Well, what fun is just looking on Pinterest? Although it is pretty darn fun, I needed to get my booty into action and make something.
My friend Kaisha kick-started me when we had our Saturday scrapbooking day a few weeks ago. Except for she didn't scrapbook. She made crafts she had found on Pinterest.
Exhibit #1. Yard lollipops (for her sweet Emma's 2nd birthday).
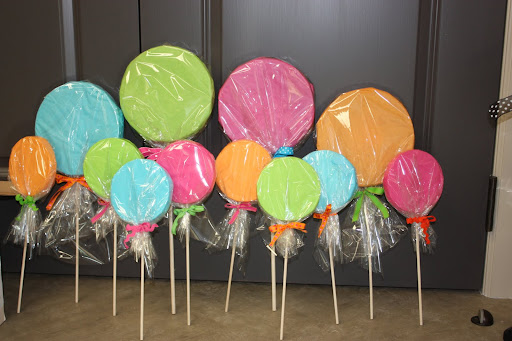
Exhibit #2. These canisters will hold seasonal candy. "Boo" for Halloween and "Joy" for Christmas. (You can change out the lettering.) This was a birthday gift for her sister.
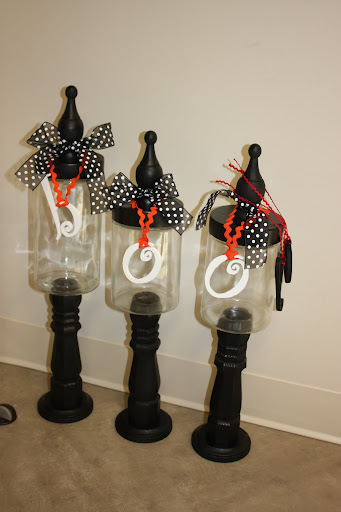
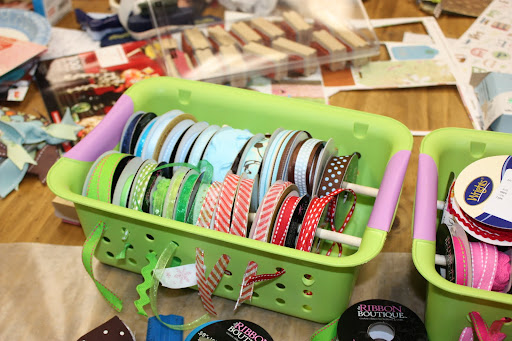
Exhibit #3: ribbon storage. I love me some organizational containers. Will says I just like to buy containers to put stuff in. This is an awesome way to organize ribbon. I came straight home and made this myself. I already had the containers, purchased some pre-cut dowel rods from Hobby Lobby and voila. 3 containers full of easily accessible ribbon.
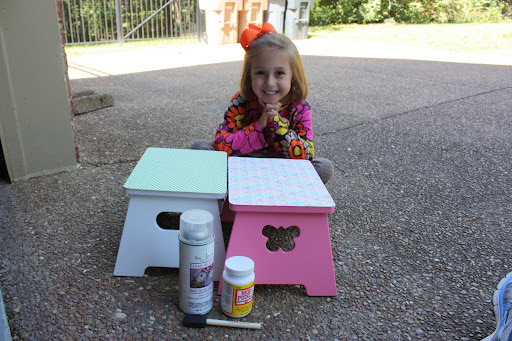
So on to my own first real Pinterest project ... covering the kids' bathroom stool. (These stools came from Target and run $12-14 I think.) We've had these a while and the tops were starting to look ragged and dirty.
Supplies needed:
stool
Mod Podge (I used matte)
Clear acrylic spray (this was $5 at HL)
scrapbook paper
foam paint brush
Time
(1) I traced the top of my stools onto my scrapbook paper. I actually ended up having to cut it a little smaller to fit the top. You can figure out what works best for you.

{Cute helper is not required.}
(2) Clean stool. (3) Brush modpodge onto stool and put paper on top. You might want to use something flat (like a Pampered Chef stoneware scraper) to smooth out the wrinkles. (4) Dry. If you don't, your paper will wrinkle up from being too wet when you apply the top coat of modpodge. (5) Apply top coat of modpodge. (If you've never used modpodge before, it will be clear when it dries.) (6) Dry.
(7) Spray entire top with clear acrylic spray. This will water-proof the paper, a necessity since these will be near the bathroom sink.

The finished product. You can see the tutorial I used here.
No comments:
Post a Comment